Happy New Year! Time for a New Challenge

It’s January and time for the newest edition of the Great Cakes Soap Challenge Club. This month we are trying the Circling Taiwan Swirl. We had an excellent tutorial from Elaine Wright of Misty Springs Bath and Body. If you haven’t seen Elaine’s videos, head over to You Tube (after you finish looking at all the beautiful Challenge Soaps) to see what a creative, inventive soaper she is!

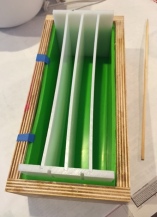
We started with a divided loaf mold. The requirement was at least 4 sections as you see in my picture below.

Mold
Mold w/ dividers in place.


We were free to do whatever colors we wanted, whatever scent, and any recipe. I quickly found out I wanted to keep fairly thin trace so I used a nice, slow recipe along with Brambleberry’s Pineapple Cilantro FO. They describe it as well behaved and I can verify that in my recipe I had plenty of time to pour and swirl using this fragrance oil.  And let me tell you about the scent! YUMMY!!!!!! It makes me smile every time I get a whiff 🙂


I needed a lift so I wanted to use colors that made me happy. I also wanted something that tied into the scent. I chose green, yellow, white, and an ITP swirl of yellow and orange for my four colors. I used titanium dioxide for the white and the rest of the colors were Nuture’s micas. (and a bit of green oxide) The green was a combo of green oxide and Shamrock Gold. If you haven’t used one of Nuture’s Shamrock Greens, they contain a good amount of “sparkle”. In my case I used Shamrock Gold, and if you look closely you can see the gold shimmer in the green. They also have a Shamrock Silver that is gorgeous. I used Yellow Vibrance and Orange Vibrance for my other colors. Once poured I used a dowel to do a basic Taiwan swirl all the way thru the mold. Then I “outlined” the mold…round and round until I was happy with the pattern.

Circling Taiwan in Mold
Putting it to bed for a good gel.

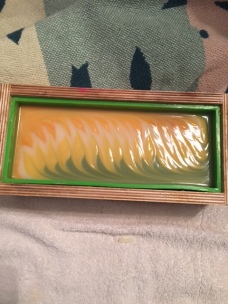
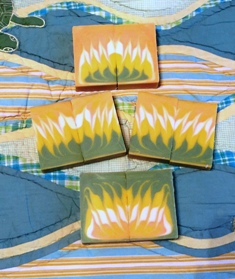
Finally it was time to cut. In this technique you cut horizontally to uncover the beautiful swirl. You can “bookend” the two bars to form lovely patterns, and if you did it right you’ll get a lotus look. My mold is 3″ wide and 9″ long so I cut 4 – 2.25″ sections vertically. Then I split each of those sections horizontally. Pictured below are my 4 sets of bars from this loaf. I really liked all of them, but the two sets from the ends gave the best lotus looks. Wish me luck!

taiwan lotus group

Great Cakes Soapworks Soap Club Challenge

Welcome! December’s challenge was to use an impression mat to create a textured and detailed top to our soaps. I was excited to try this December Challenge because I usually don’t do a very detailed top on my soaps. We had the choice of using a purchased impression mat or making our own.  I purchased a couple of mats with the intention of making my own, but that didn’t happen!                                                                                                                                    Mats


I made three batches. My first came out really nice. I used the lacy looking mat in my 2.5# mold and did a high/low water combination. I used a divider and pour a high water base on one side and a low water base on the other. I did a drop swirl with 2 more colors and did a low water drop in the high water side and vice versa. Then I did a hanger swirl once I removed the divider. I didn’t pre pour the mat as I wanted the color variations in the lace. Here is a photo of that batch…

lace Blue 3       
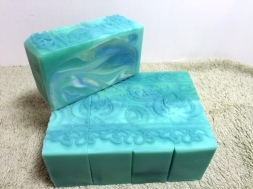
The next two batches weren’t what I was looking for. For the second batch I decided to do a dry mica on the “grapevine” mat. I loved the pop of color that gives and proceeded to make my soap.  I decided to switch molds right before I started but forgot to adjust my batch. So, I ended up with wide bars that are only about an inch and a half high. Too bad, I liked the colors in this one.   Lace Yellow

I wanted to see what a contrasting lace top would look like so I decided to do a coffee soap with a creamy top. I used an FO that was new to me and it strangely colored the soap a decidedly not coffee color!

Lace Coffee

I think I’m sticking with #1. What do you think?

TALL & SKINNY SHIMMY- GREAT CAKES SOAPWORKS NOVEMBER CHALLENGE

Welcome! This month’s challenge is a technique called the Wall Pour. The super talented soap artist, Tatiana Serko, demonstrated this technique in a video and also showed us how to make a tall, skinny mold out of foam board. Thank goodness, because I made a BUNCH of batches for this challenge! Let me show you!

I started out a little over confident and made a batch in my Tall & skinny  2.5# mold from Nurture Soap Supply. The colors are great, love the scent ( Earl Grey Tea w/ Lemon from Brambleberry) but I didn’t get any “shimmy.

First Try!
First Try!


Decided to practice my stamping since this wasn’t going to be my entry!

On to the next batch. I decided to use the same recipe and mold and once again I over blended. This next one also had nice colors and scent but the colors are layered rather than shimmying thru the bar.

Attempt # 2
Attempt # 2

Pulled the stamp out again. This one isn’t going to make it as an entry, either.

OK, I’ve learned two things here….I am wasting too much oil and I need to quit stick blending about 20 seconds sooner than I think!!! I’m going to get some foam board and make some molds.

I ended up with three.

Mold making was fun. These little suckers hold about a pound of oils and make about 5 – 6 bars. This is a 6″ long mold that is 3.75″ tall. Great for experimenting with techniques, new fragrances, or new recipes. Learning this skill is going to be a money saver!

Attempt 3
Attempt 3

OK, with my new little molds and my new lessons learned I masterbatched for two simultaneous tries. This one I wanted to look soft and dreamy. The scent is Ginger Ale, a slow moving scent so I had a lot of time to mix. I made sure I stopped at emulsion, and I gave a little more tilt than just resting on the pencils. My colors stayed nice and pastel and I think I got a nice flow thru the center of the bar. It looks so sweet and feminine. It just doesn’t POP on camera…..

Attempt 4
Attempt 4

Same recipe, Neroli & Shea Blossom as the FO, Same trace and tilt as #3. I like the darker colors and I’m really happy with the flow thru the center. I like how the blue and yellow kind of push up thru the other layers. Yep, liking this one! Maybe one more……

Attempt 5
Attempt 5

I was trying for something bolder. I forced gel by placing this on a heating pad. Not a great idea with a foam board mold 🙂 The tape lining the inside released and stuck to the soap. The good thing was the soap was so hard it peeled off easily. I don’t think this one “shimmys” as much.

This was such a FUN challenge! Thank you, Amy, for coming up with this one. And thank you, Tatiana, for your videos. I went back and watched them after my first two attempts and it made a big difference.

Now I can’t wait until next month…

GREAT CAKES SOAPWORKS CHALLENGE OCTOBER- ALTERNATIVE LIQUIDS

Wow! This was a thought provoking challenge…..what liquid and why? What colors and how? Would I scent this soap? I had to totally rethink my usual methods. I usually use goat milk so I did not want to use that. It wouldn’t be a stretch. I recently participated in a soap swap and a lot of the swappers had used aloe in their soaps, so that sounded pretty cool.

I researched and found there was a lot of ways to use aloe and a lot of reasons.

Dr Andrew Weil had this to say on his website:

Aloe is an effective, natural treatment for a variety of skin conditions, including burns, abrasions, cold sores, psoriasis, sunburn and frostbite. Three studies have shown that it has some beneficial effect as a topical treatment for mild psoriasis. While widely thought to promote the healing of wounds, studies of this therapeutic use have yielded mixed results.”

Wow! Powerful stuff, but would it survive the Lye Monster?? I asked a lot of my soap making buddies and most thought that aloe juice mixed with lye probably would not survive but maybe, just maybe aloe added to oils or at light trace might have beneficial properties. No one I talked to had actually done any studies so I’m going to conclude that it adds label appeal….particularly since I used it as my lye liquid.

So what about scent? I almost always use fragrance oils but just recently completed an aromatherapy course so the timing was perfect to concoct an essential oil blend. I used a blend of Grapefruit, Bergamot, and Patchouli. I’m very happy with the scent.

On to color….I decided to infuse olive oil with color. I used Paprika (which I had done before) and Indigo (first time) and mixed it with olive oil and let it sit in a sunny window for a few days. On soap day I strained the oil since I didn’t want the scratchy grains in the soap.

A L Challenge Oil

I essentially masterbatched my lye and made three batches of oils. One portion had my usual recipe with the Paprika olive oil, one had the Indigo olive oil, and one just had natural olive oil.  I used a small loaf mold and did a “wall pour”. Here’s what it looked like in the mold.

A L Challenge in Mold

The colors actually went thru a lot of changes. The indigo went VERY grey, but ended up a blue grey shade. The uncolored portion got yellow, but turned creamy, and the paprika colored portion stayed true throughout. Here are my finished bars. I’m really happy with them. I hope you like them as well!

IMG_0941

A L Challenge 1

Great Soapworks Challenge The Clyde Slide

I was excited to try this month’s challenge as I love Clyde’s YouTube videos. I must say, this one is harder than it looks! I tried three batches and really didn’t get good feathering. Here are some pics.

Second try in the bowl. This is a lard/olive oil/ coconut/castor recipe with a little apricot kernel oil (because it just came in and I've never used it). It's a very fluid recipe that is slow to trace, so perfect for this technique.
Second try in the bowl. This is a lard/olive oil/ coconut/castor recipe with a little apricot kernel oil (because it just came in and I’ve never used it). It’s a very fluid recipe that is slow to trace, so perfect for this technique.
I poured the soap from one end of the mold and let it flow, then used a comb for the top. I liked this effect.
Final result!  I used Cucumber Melon FO so I wanted to use melon colors. My orange looks pink in the pics.
Final result! I used Cucumber Melon FO so I wanted to use melon colors. My orange looks pink in the pics.
Third try. I decided to use bolder colors, hoping the "wisps" would show more clearly. Here is the pour into the bowl.
Third try. I decided to use bolder colors, hoping the “wisps” would show more clearly. Here is the pour into the bowl.
Used the same design on top.  The colors are Really Red, Maya Gold, and Black Pearl Micas. I used Love Spell as the FO
Used the same design on top. The colors are Really Red, Maya Gold, and Black Pearl Micas. I used Love Spell as the FO
The soap... This time I poured along the side of the mold and moved the bowl back and forth. It gave a little better look.
The soap… This time I poured along the side of the mold and moved the bowl back and forth. It gave a little better look.

First Great Cakes Soapworks Challenge. Nonpareil Technique

My Sand &Sea
My Sand &Sea

My entry. I love the colors and the feeling of movement with the swirl. Hope you like it, too!

I joined last month but chickened out and didn’t submit my entry. I promised myself I was entering this time no matter what. I made three attempts….each worse than the one before. My entry is my first attempt.

My $ Store Slab Mold

I didn’t have a slab mold, but found this at the $ store. It holds about 24 ounces and makes four big bars.

I liked this!
I liked this!

Was really happy with this stage. Maybe it would have been good to stop here. I live near the beach and wanted something that reminded me of the sand and surf. The tan is colored with clay and I used several micas in the blue to turquoise to aqua range for the water.

My sand & surf

Here is after the mantra swirl. Can’ wait until it is ready to cut.